Getting Started with Intel RealSense on WendyOS: Stream Color, IR, and Depth in Python
Join our Discord community to connect with other developers building with WendyOS!
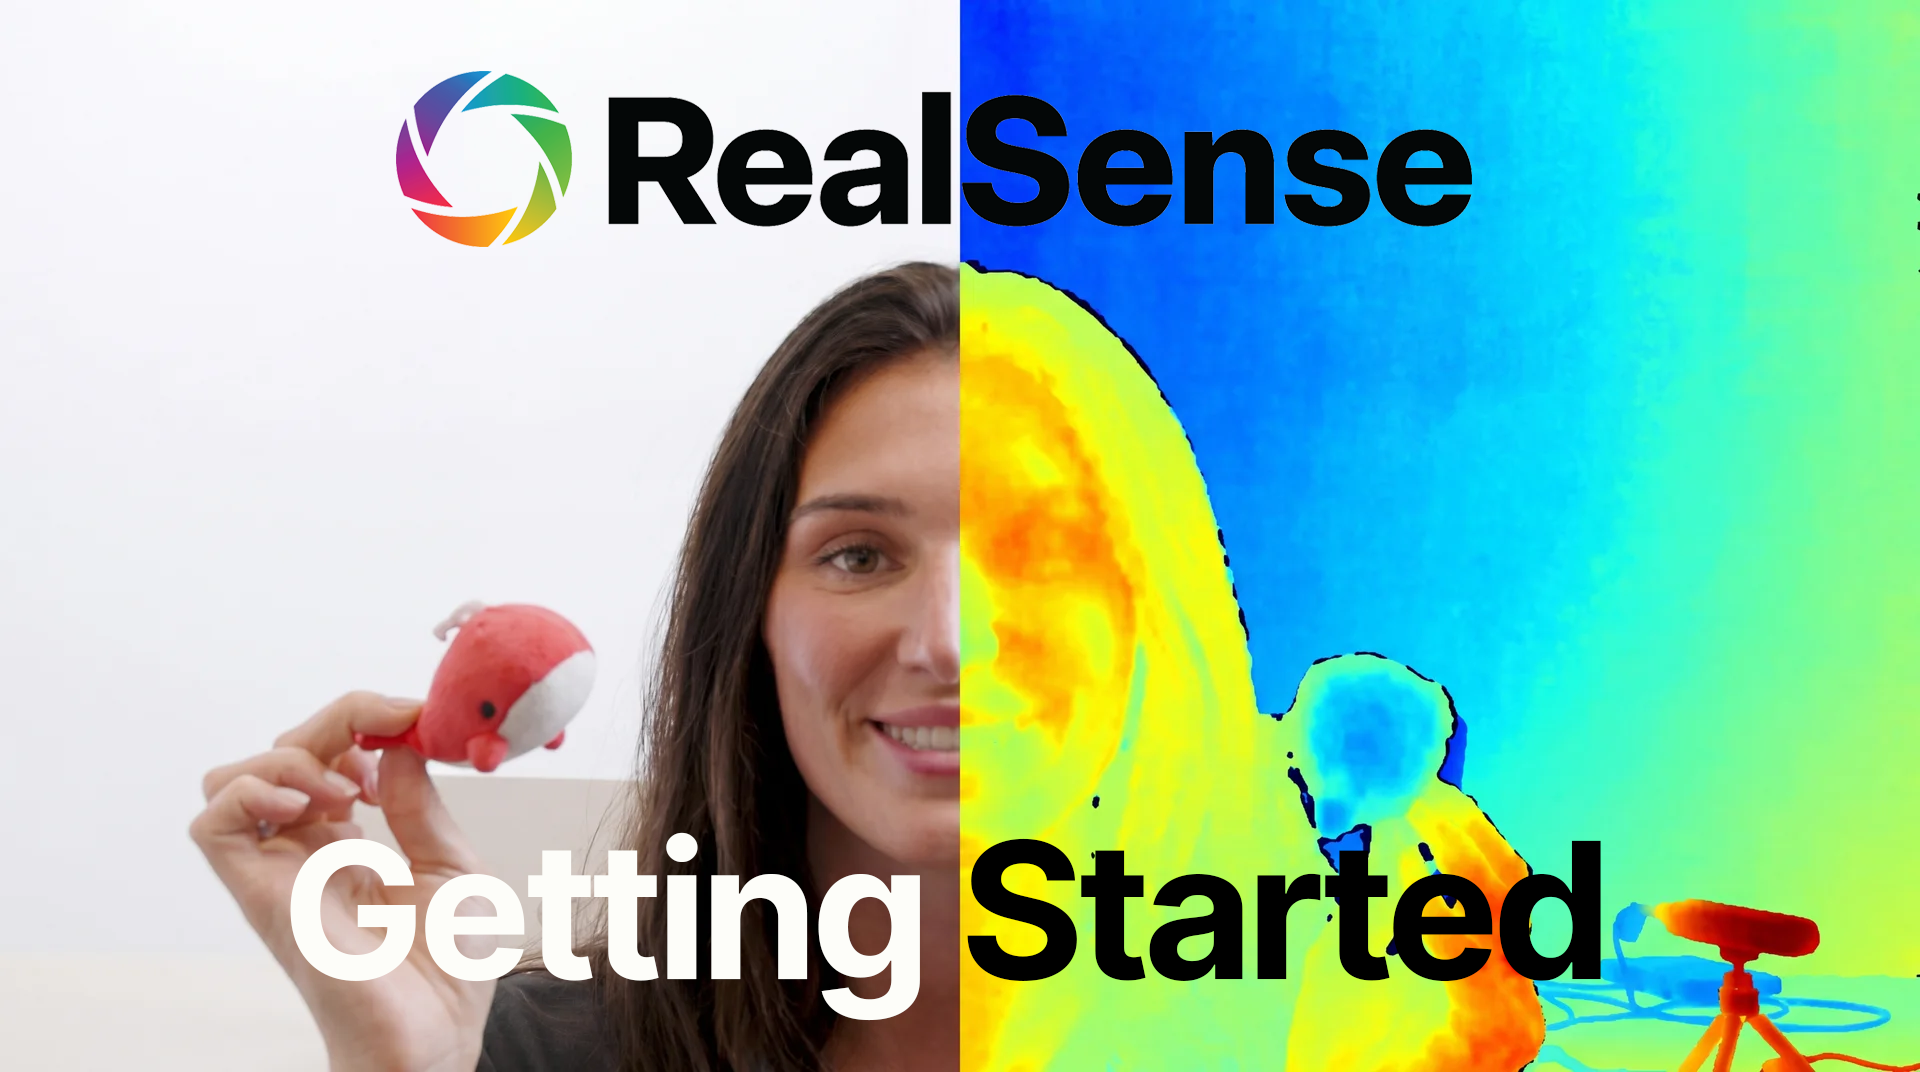
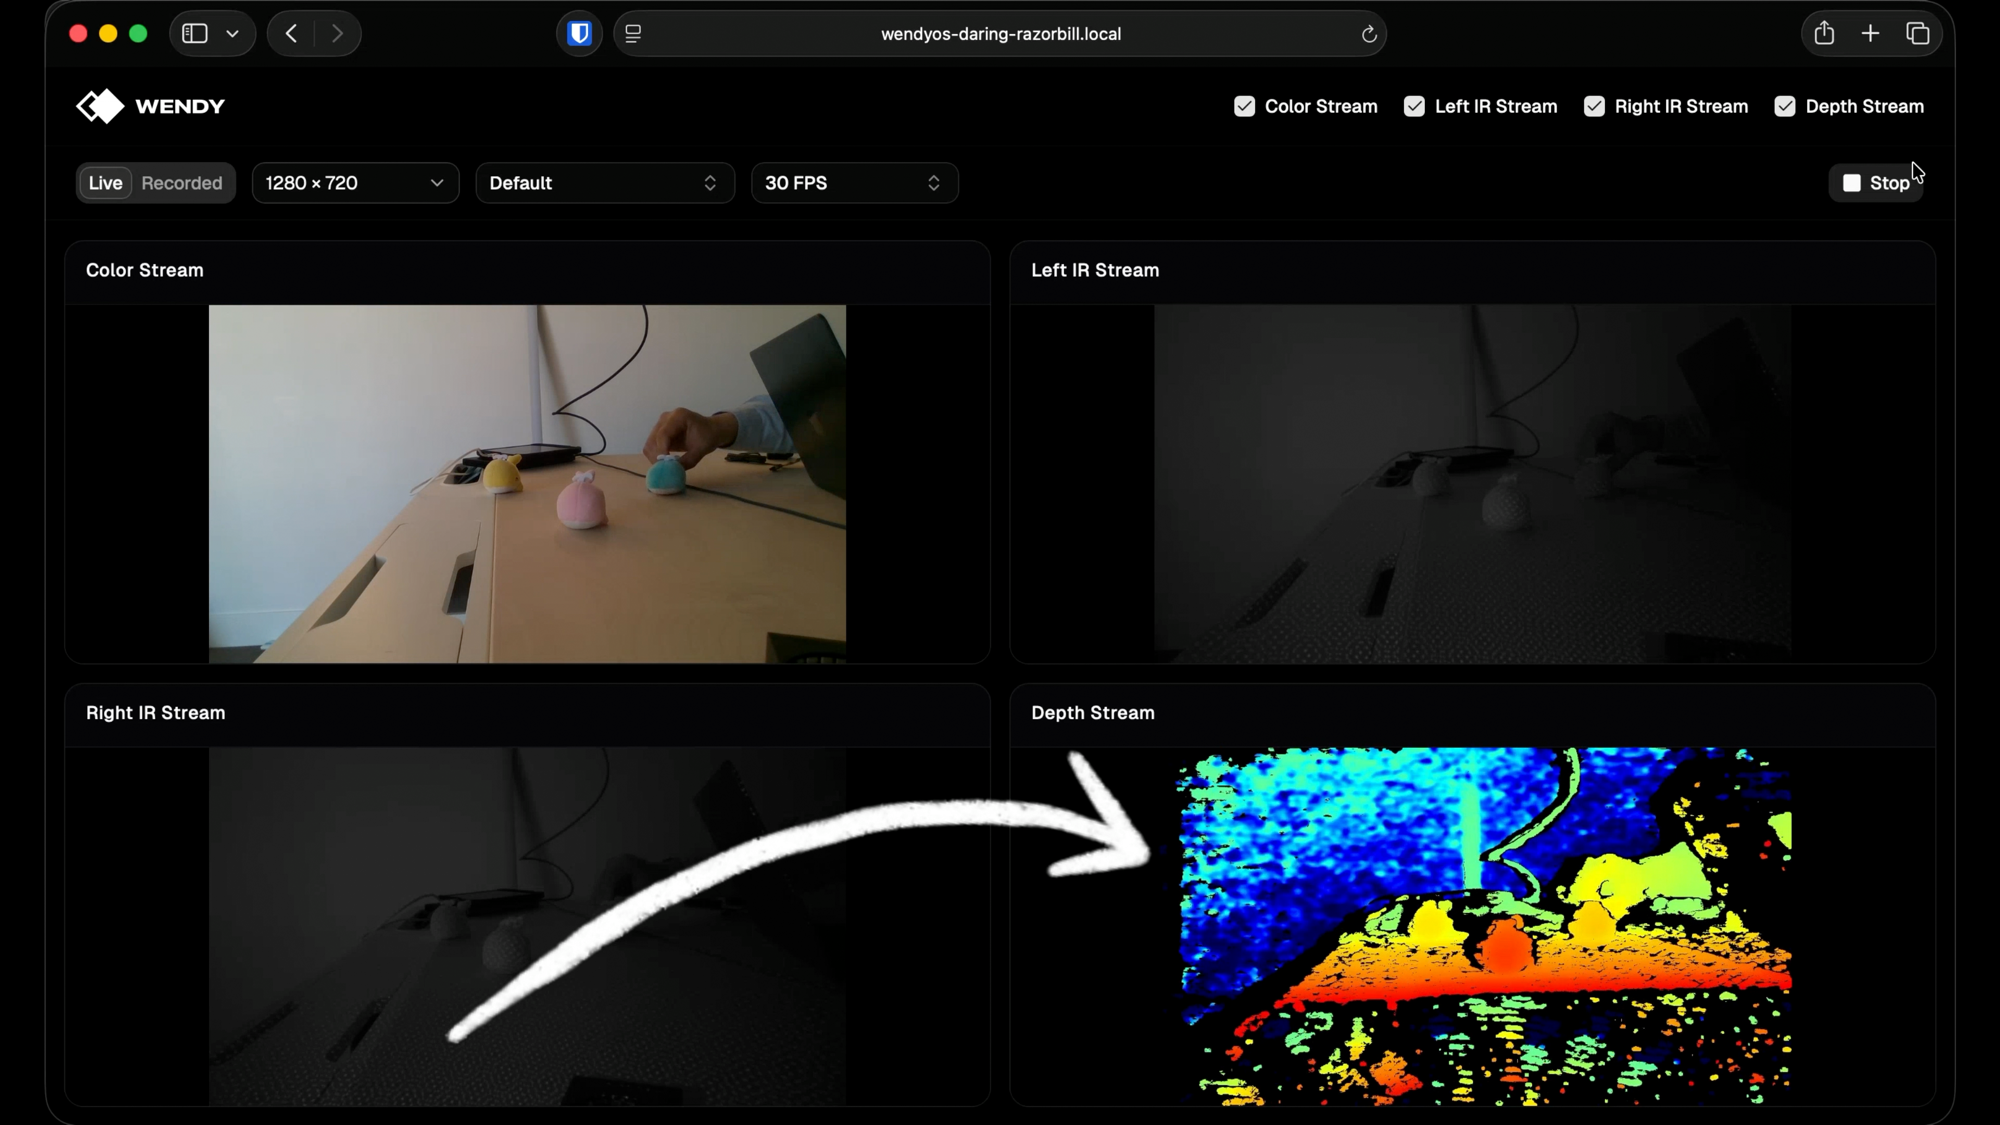
Here's what you'll have running on your device in a few minutes - all four RealSense D415 streams (color, left IR, right IR, and colorized depth) live in a browser:
TL;DR - skip the tutorial
If you just want to run it, one command scaffolds the full project:
wendy init \
  --app-id realsense-generated-python \
  --target wendyos \
  --language python \
  --template realsense-camera \
  --assistant skip
Then:
cd realsense-generated-python
wendy run
That's it. The CLI cross-builds the multi-stage Docker image, ships it to your Jetson or Pi over USB-C, brings the container up with USB and host networking, and pops your browser open to the live RealSense streams.
Full CLI reference: wendy.sh/docs.
The rest of this post walks through everything the template generated - useful if you want to understand the architecture, swap out the camera, add another stream, or fork it into something custom.
What you'll build
A four-stream live viewer for an Intel RealSense D415:
- Color - the RGB sensor at up to 1080p
- Left IR + Right IR - the stereo infrared pair
- Depth - the depth map, run through librealsense's colorizer for visualization
Each stream is published as its own MJPEG endpoint, so the React frontend just drops them into <img> tags - no WebRTC, no custom decoder, no client-side library needed. A FastAPI server owns the pipeline, a single background thread polls frames, and HTTP handlers read the latest JPEG bytes per stream.
Prerequisites
- A WendyOS or Linux device. This template runs great on:
- NVIDIA Jetson - Orin Nano, AGX Orin, and the upcoming Jetson Thor
- Raspberry Pi - Pi 4 and Pi 5 (with WendyOS or vanilla Ubuntu)
- Any Ubuntu host - works fine on a plain x86_64 or aarch64 Ubuntu machine if you'd rather not flash a device
- An Intel RealSense camera. The template defaults match the D415, but D435, D435i, and D455 work with the same code (you may need to tweak supported resolutions/FPS in
src/App.tsx).- Buy on Amazon, B&H Photo, or Mouser
- First time using RealSense? Intel's developer hub at dev.realsenseai.com has datasheets, the SDK reference, and sample apps to dig deeper.
- The
wendyCLI:brew install wendylabsinc/tap/wendy
Step 1: scaffold the project
wendy init \
  --app-id realsense-generated-python \
  --target wendyos \
  --language python \
  --template realsense-camera \
  --assistant skip
This pulls the realsense-camera template from the Wendy templates repo and writes it to ./realsense-generated-python/. The --assistant skip flag tells the CLI not to launch Claude Code or Codex afterwards - we want to read the code, not vibe-code on top of it.
Here's what the template gives you:
realsense-generated-python/
├── wendy.json              # entitlements, readiness, lifecycle hooks
├── Dockerfile              # multi-stage: frontend + librealsense + runtime
├── requirements.txt        # fastapi, uvicorn, numpy, opencv-python-headless
├── server/
│   └── main.py             # FastAPI MJPEG server
├── src/                    # React + Vite frontend
│   ├── App.tsx             # the control panel
│   ├── main.tsx
│   └── components/ui/      # shadcn primitives
├── package.json
├── vite.config.ts
└── index.html
Step 2: read wendy.json - the only WendyOS-specific file
{
    "appId": "realsense-generated-python",
    "version": "0.1.0",
    "entitlements": [
        { "type": "usb" },
        { "type": "network", "mode": "host" }
    ],
    "readiness": {
        "tcpSocket": { "port": 8000 },
        "timeoutSeconds": 60
    },
    "hooks": {
        "postStart": {
            "cli": "wendy utils open-browser http://${WENDY_HOSTNAME}:8000"
        }
    }
}
Three things to notice:
usbentitlement - without this, the container can't see the RealSense over USB. WendyOS apps are sandboxed by default; you opt in to hardware access.networkhost mode - port 8000 binds directly on the device's network stack, so any browser on the LAN can hit it without port mapping.postStarthook - once the readiness probe (TCP on 8000) succeeds, the CLI runswendy utils open-browseron your laptop, pointing at the device. This is what makeswendy runfeel mobile-like: build, deploy, and the UI just opens.
Step 3: read the Python server - server/main.py
The server is one file, ~450 lines. The shape is:
RealSensePump  ← owns the librealsense pipeline, runs one worker thread
  ↓ publishes latest JPEG per stream
FastAPI routes ← /stream/{id}, /start, /stop, /config, /health
The pump
RealSensePump wraps a single rs.pipeline() and enables all four streams at the configured resolution:
config.enable_stream(rs.stream.color, w, h, rs.format.bgr8, fps)
config.enable_stream(rs.stream.depth, w, h, rs.format.z16, fps)
config.enable_stream(rs.stream.infrared, 1, w, h, rs.format.y8, fps)
config.enable_stream(rs.stream.infrared, 2, w, h, rs.format.y8, fps)
The background worker loops on pipeline.wait_for_frames(), encodes each frame to JPEG with OpenCV, and stores the latest bytes per stream under a Condition. The depth frame goes through rs.colorizer() first so you get the familiar blue/green/red depth gradient instead of raw uint16.
Two locks, strict order
The interesting part of the pump is the locking. Reconfiguring resolution or FPS needs to stop the pipeline, wait for the worker, and start a fresh one - without racing a new pipeline.start() against the old worker's pipeline.stop() for the USB device. The template uses two locks:
_lifecycle_lock- held bystart,stop, andconfigureacross the entire restart. The worker thread never touches it._lock- protects mutable state shared with the worker. Held briefly, never across a join (the worker takes it inside_apply_pending_preset, which would deadlock).
Lock order is always lifecycle first, then state. The worker only touches state, so inversion is impossible.
MJPEG streaming
Each /stream/{id} endpoint returns a StreamingResponse with multipart/x-mixed-replace. The iterator just reads the latest frame, yields it with an MJPEG boundary, and skips identical consecutive frames with a 5ms sleep to avoid hammering the client:
async def _mjpeg_iter(stream_id):
    last = None
    while True:
        frame = await asyncio.to_thread(pump.latest, stream_id, 5.0)
        if frame is None:
            break
        if frame is last:
            await asyncio.sleep(0.005)
            continue
        last = frame
        yield f"--{BOUNDARY}\r\n".encode() + b"Content-Type: image/jpeg\r\n" + ... + frame + b"\r\n"
When the user clicks Stop in the UI, pump.stop() clears _latest and notify_alls - latest() returns None, the iterator exits, and the HTTP connection closes cleanly.
Visual presets
The D415's depth sensor supports named presets (default, hand, high-accuracy, high-density, medium-density). Switching presets does not require restarting the pipeline - the template applies them live via set_option(visual_preset, ...) on the running depth sensor. Resolution and FPS changes do require a restart, which is why the lifecycle lock exists.
Routes
| Route | Purpose |
|---|---|
GET /stream/{id} | MJPEG stream (color, ir-left, ir-right, depth) |
POST /start | Start the pump |
POST /stop | Stop the pump |
POST /config?width=&height=&fps=&preset= | Reconfigure (restarts pipeline if w/h/fps changed) |
GET /health | Returns running state and per-stream FPS |
GET / | Serves the built React SPA |
The SPA mount happens after all API routes are registered, so /stream/*, /config, etc. take priority and everything else falls through to index.html.
Step 4: read the Dockerfile - three stages
# Stage 1 - Build the React/Vite frontend
FROM node:22-alpine AS frontend-builder
WORKDIR /build
COPY package.json package-lock.json ./
RUN npm install --no-audit --no-fund
COPY . ./
RUN npm run build
Standard Vite build. The output lands in /build/dist.
# Stage 2 - Build librealsense + Python bindings from source
FROM ubuntu:22.04 AS librealsense-builder
...
ARG LIBREALSENSE_VERSION=v2.55.1
RUN git clone --depth 1 --branch ${LIBREALSENSE_VERSION} \
      https://github.com/IntelRealSense/librealsense.git /tmp/librealsense \
    && cmake -S /tmp/librealsense -B /tmp/librealsense/build \
        -DBUILD_PYTHON_BINDINGS=ON \
        -DFORCE_RSUSB_BACKEND=ON \
        ...
This is the stage that earns its keep. Intel publishes librealsense debs for x86, but not for aarch64 - and Jetson and Pi are both aarch64. So we build it from source against v2.55.1 and copy the resulting pyrealsense2*.so and pybackend2*.so into a Python dist-packages directory.
-DFORCE_RSUSB_BACKEND=ON is important: it tells librealsense to use its userspace USB backend instead of the V4L2 kernel driver. WendyOS containers don't have access to host kernel modules, but USB passthrough via the usb entitlement works fine with the userspace backend.
# Stage 3 - Runtime
FROM ubuntu:22.04
...
COPY --from=librealsense-builder /usr/local/lib /usr/local/lib
COPY --from=librealsense-builder /usr/local/include/librealsense2 /usr/local/include/librealsense2
RUN ldconfig
...
RUN python3 -c "import pyrealsense2 as rs; print('pyrealsense2 OK')"
The runtime stage is slim: Python, libusb, libssl, the librealsense libraries from stage 2, and the Python deps. The import pyrealsense2 sanity check fails the build early if the bindings aren't usable - much better than discovering it at runtime on the device.
Step 5: read the React frontend - src/App.tsx
The frontend is a single React component using shadcn primitives. The shape:
- Four checkboxes - toggle which streams render
- A resolution + FPS picker, with FPS options gated by what the D415 actually supports at each resolution
- A preset dropdown that hits
/config?preset=...for live updates - Start / Stop buttons that hit
/startand/stop - A 2x2 grid of
<img src="/stream/color">,<img src="/stream/ir-left">, etc.
The clever bit is the FPS table:
const SUPPORTED_FPS_BY_RESOLUTION: Record<string, number[]> = {
  "640x480": [6, 15, 30, 60],
  "1280x720": [6, 15, 30],
  "1920x1080": [6, 15, 30],
}
The D415 firmware only resolves a fixed set of FPS values per stream profile, and color caps the combined set when all four streams are enabled. 90fps works on depth/IR alone at 480p, but color can't keep up - so the dropdown disables it rather than letting you pick something the pipeline will reject.
The <img> tags use a streamSession counter in the key to force a remount on Stop → Start, so the browser drops its old connection cleanly.
Step 6: deploy
cd realsense-generated-python
wendy run
The CLI:
- Discovers your default WendyOS device (or you pick one with
--device) - Builds the multi-stage Docker image, cross-compiling for the device's architecture
- Pushes it to the device's local registry
- Brings the container up with the USB and network entitlements
- Waits for the readiness probe on port 8000
- Runs the
postStarthook, which opens your browser tohttp://<device>.local:8000 - Streams container logs back to your terminal
Plug a D415 in, hit Start, watch all four streams light up.
Where to go from here
A few ideas if you want to fork this into something:
- Add a recorder - the pump already encodes JPEG; pipe those bytes into an
.mp4withffmpeg-python. - Run YOLO on the color stream - drop in
ultralyticsand a YOLOv8 model, overlay boxes before encoding. The GPU entitlement gives you CUDA on Jetson. - Swap the camera - D435 and D455 use the same librealsense bindings. Just adjust the supported resolutions.
- Stream over WebRTC instead of MJPEG - MJPEG is great for "drop into an
<img>" simplicity, but WebRTC gets you sub-100ms latency.
The whole template is the kind of thing that's annoying to assemble from scratch - finding the right librealsense version, getting the aarch64 build right, handling pipeline restarts without deadlocking. wendy init --template realsense-camera gives you a working starting point.
Full CLI docs at wendy.sh/docs.
Related post
Expand your knowledge with these hand-picked posts.
Recommended LLMs for Jetson Orin Nano and Jetson Thor on WendyOS
Which local LLMs to run on the NVIDIA Jetson Orin Nano 8GB and Jetson AGX Thor with the Wendy llm template, plus how to install, scaffold, and deploy them with the Wendy CLI.
Wendy Labs - Wendy Labs Team
WendyOS vs. balena: Fleet Containers, Now Built for Physical AI
balena pioneered container fleets for IoT. WendyOS takes the same idea to robotics and Physical AI - GPU and camera access, ROS 2, a local build-and-stream loop that works offline, and Apache 2.0 licensing. Here's how they compare.
Wendy Labs - Wendy Labs Team

Ready to build on WendyOS?
WendyOS is the open-source operating system for Physical AI — deploy your apps to NVIDIA Jetson, Raspberry Pi, and more in seconds, over USB-C, wireless, or the cloud.